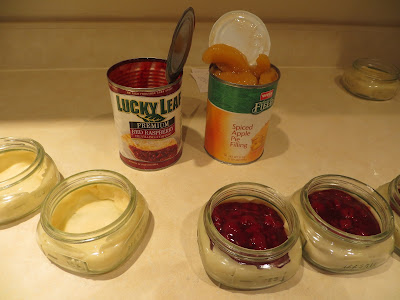
The ingredient list couldn't be simpler. For 8 tiny pies, we needed:
8 half pint mason jars
3 refrigerated pie crusts
a bit of flour
2 cans of fruit pie filling
First spread a bit of flour on your countertop, and then roll out the pie crusts just a bit.
Cut each crust into 4 pieces and press one piece down into the bottom and up the sides of each jar. You will be using two of the pie crusts for this part.
Don't fuss too much - the crust doesn't have to be perfectly smooth in there. It just shouldn't extend up over the lip of the jar.
Fill each jar to the bottom of the neck with fruit pie filling. Each can of fruit filling will fill about four jars.
For our pies we chose spiced apple pie filling and red raspberry filling. We had to cut some of the larger apple pie slices in half to fit better down into the pies.
You can get as fancy as you like with your top crusts. We used tiny shape cutters and cut out pretty little designs in ours.
Place the dough circle down in each jar on top of the pie filling.
Note: I wish I had purchased the half pint jars with straight sides, not the ones with the curved out sides that you see here. At this stage of the process it would have been easier to use a fork and crimp the edges of the top crust to the edges of the bottom crust.
These pies are all ready for the oven:
As I usually recommend when baking any pie, load the eight pies onto a cookie sheet before placing them into the oven.
Our little pies baked about 40 to 45 minutes at 350 degrees. Several similar recipes called for baking times of only 20 to 25 minutes, but ours didn't seem to be done at that time. Ovens vary, so the best advice is to bake them about 25 minutes, check them, and add more time as needed.
Here are our finished little pies, in all their warm, luscious goodness:
Allow your pies to fully cool before putting on the lids and rims, if you won't be eating them right away, although I don't really see how that is possible. They just smell and look so yummy!
Oh, and don't forget the vanilla ice cream!


Oh my gosh, Jill. I love this idea. Thanks so much for all the details. Are those cookie cutters? or what did you use to cut out the designs?
ReplyDeleteThey are teeny tiny shape cutters from my father-in-law who used to be a chef. I think they are used for crudites, maybe?
DeleteThis is so great! I LOVE it! Will have to try!
ReplyDeleteSince I'm not a cook that sounds like quite a bit of work to me. But the results look wonderful and if somebody wanted to make them for me I sure wouldn't turn them down.
ReplyDelete