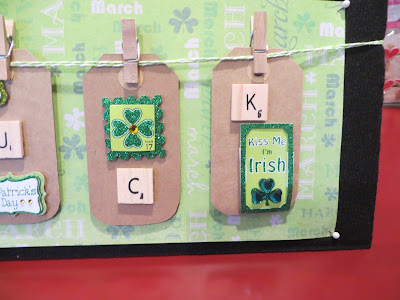
I was cruising around one night on that totally addictive and time sapping PINTEREST one night, and came across this piece of St. Patrick's Day wall decor. Since I had an extra shadow box picture frame available from a previous trip to the craft store, I decided to make a similar one for myself.
I want to give credit for the idea where credit is due, so here is the picture that Leanne shows in her tutorial on her website. When I saw her picture I loved it, as the husband/lover/gamer is quite an avid scrabble player, and it's simply a cute and unique piece.
I knew, however, that I wanted just a bit more color in mine, so I hunted through my pile of colored papers to find a very green background paper.
Then, when I asked my husband if I could have just four of his scrabble tiles, L, U, C, and K, he looked at me like I had gone straight out of my mind. Geez, there are four hundred tiles in the game box, what loss would be four tiles? Then he proceeded to explain that K is worth 5 points and if it was at the juncture of two words, it would be really worth.......blah, blah, blah. What do I know? I'm not a scrabble expert.
So off to the craft store I went again, looking for some cheap wooden lettered pieces, which I was able to find easily. I had to use a fine point black permanent marker to apply the point values on each tile as subscripts.
Along with the letter tiles I purchased several colorful St. Patrick's Day stickers, and some green pattered ribbon. Other than those items, I already had the other things at home from previous projects.
First I cut the background paper to fit into the back of the frame, and attached it with tiny pins at each corner.
Next I created each of the four letter cards. I used my glue gun to securely affix the wood tiles to each card, and 3-D foam dots to raise up some of the stickers.
I wound several strands of green and white bakers' twine together and made a tiny slit on either side of the backboard. The twine was pulled taut into the slits then taped securely onto the back of the backboard.
At this point, I clipped the four letter cards onto the line, spacing them for final positioning. Because I am using a shadow box, I wanted a very 3-D feel to the project, and so I used a 3-D foam dot under the bottom of each card, both to give dimension and to secure each card from swaying and potentially sliding out of place while the piece is moved for storage.
Although I was happy with the way it looked, I still felt it needed that last burst of color, and so I made a bow and glued it up onto the corner. Now it looks finished, and so I promptly went and hung it onto my kitchen wall, right by the table.
"LUCK" is a 10 point word, and if you ask me, this is a 5 star project. I'm pleased with the way it turned out, and now I'm officially done decorating for this next holiday. Time to work on some Easter stuff.
Oh - by the way - look way down below at the bottom of the blog screen. I'm excited to announce that there are some trips in the planning. Can't wait!


Looks like you made 10 points, or more if you landed on a double or triple square (grin). Nice job.
ReplyDelete*gasp* I had no idea you were "one of those" kind of women! I'm addicted to Pinterest and have some of my greeting cards and graphite portraits on that site! I've been making cards for 10 years and doing portraits for 40 years!
ReplyDeleteMom- make me some holiday decorations for my house. I need some for Christmas, Valentine's Day, and Springtime. GET ON IT :)
ReplyDeleteoooooh, LOVE! I came by looking for the exact measurements for the wreath and I noticed I had missed this craft. Oh you lil' devil, now I have to make this too. WOOHOO!
ReplyDeleteWait until you see our home. You were truly the inspiration my friend. Thank you.
PS - the next time you are at a yard sale or goodwill pick up a used scrabble game. Those tiles are so useful in so many projects. I especially like the darker red tiles with white writing from the Deluxe Scrabble. HUGS!